Baja SAE
Frame 2021-22
As the chassis subteam lead, I was in charge of designing the frame of the 2021-22 vehicle in SOLIDWORKS. I worked in conjunction with the ergonomics, suspension, and powertrain subteam leads to ensure all of their components fit within the frame and are appropriately braced. I efficiently reduced the weight of the frame by approximately 15% by decreasing length, height, and width of the car as well as the number of tubes to be welded. These reductions improved the acceleration, top speed, and handling of the car while not compromising the necessities of each subteam or safety of the driver.


FEA Simulations
To validate my frame design, I setup and ran multiple impact studies using FEA. For the front impact, roll over, front-braced member impact, and rear impact cases, I held the area of impact fixed, applying a case load determined by the expected final weight of the car fully assembled multiplied by the maximum acceleration determined in previous years. I used the FEA to determine the stresses, displacement, and factors of safety for each case, ensuring that there was no factor of safety below 1.2 for 4130 steel.
Design for Manufacturing
To manufacture the frame, I was responsible for communicating with and ordering from VR3 Engineering. VR3 Engineering requires the frame SolidWorks file, a drawing of the frame, a bill of materials, which is checked before approval for manufacture. Once they were approved, I sent over individual part files for each tube to be manufactured.

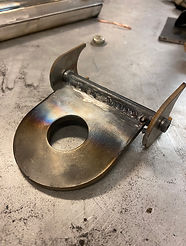
Rear Tow Hitch
I designed the 2020-21 rear tow hitch in SolidWorks. I improved upon previous years design by implementing aluminum spacers that the tow hitch rests on so that no friction welding may occur between the tow hitch and the tabs that attach it to the frame of the car. The tow hitch and tabs were water jet out of 4130 steel and the spacers were turned on a lathe using 6061 aluminum.
Body Panels
I designed the 2020-21 body panels in SolidWorks. I improved upon previous years design by using UHMW plastic as the material for the panels so the panels are lightweight yet durable. I manufactured the body panels by first laser cutting a cardboard template to be traced onto the UHMW and then cut.

School Projects
Design, Thinking, & Communication - Side Station
The Side Station was designed during the Fall of 2019, in Northwestern's Design, Thinking, & Communication course. As a small team of 3 students, we partnered with the Shirley Ryan Ability Lab in Chicago to design a device that would allow people with hemiplegia, one-sided weakness, to don a shoe independently while wearing their ankle for orthosis. Throughout the quarter, we had client interviews, user observations, and user testing, which informed our brainstorming, design, and prototyping process.


Rendering
During the winter of 2022, I took a course on rendering which taught me the basics of Keyshot. As a final project, I created a model of a Zippo lighter in SOLIDWORKS and then created a rendering using various lighting and material techniques.

CNC Machining & Injection Molding
Through Northwestern's computer integrated manufacturing course I was exposed to designing CNC machining and injection molding. Specifically, I learned how to properly design injection molding parts and understanding the limitations of injection molding. With these parts designed, I then learned how to create CAM setups in Siemens NX to machine them, determining what operations are best suited for the issues at hand. The class resulted in machining the molds to be used for injection molding and making our injection molded parts


Prop & Costume Making
Various Creations
Whenever I get the chance, I enjoy creating costumes and props from the various TV shows, video games, and whatever comes to mind. I often make these props out of EVA foam, using craft blades, a heat gun, a dremel, and various adhesives, using different techniques to achieve the look I want. Lately, I have been designing and 3D printing props. The images give insight into two projects I am currently working on.


